FileMaker and PHP: Link to A Record Using Redirect

Let’s Learn How We Can Link to A Record Using Redirect

In this article we’ll look at how you can link to a record using redirect with FileMaker and PHP.

In later versions of FileMaker we have Snapshot Links. When you work in a database you can always give someone a Project number when you need to refer to a Project. Or we can script generating a Snapshot Link. The problem with the Snapshot link is that you’ll have to remove it once you spit it out to the Desktop. AppleScript can help with that.

Another method is the fmpURL protocol. You can generate nice links such as this:

fmp://localhost.com/SomeDB.fmp12?script=open_project_link&param=PROJECTID

Then if you copy and paste this into apps it’ll open the database. If you’re on a Mac and use Messages or email this is great!

But then I ran into a problem where my client’s law firm relies on Gmail for their primary communication AND they are using it from a web browser. Now, Gmail DOT NOT know what to do with the FMP protocol so it just breaks the URL and funky things happen. I’m sure Gmail is not the only party here that does not know what to do with it.

So one—fairly simple method—of tackling the problem is referring to good old, creating a link to a record in FileMaker with PHP. I know, this is not a novel method but when I was looking for it I couldn’t find a comprehensive article on how to achieve what I want.

What you need:

  1. A web server
  2. A PHP file
  3. A script in FM that will know what to do with the parameter it receives
  4. A button on the layout to run another script to generate the appropriate link to call your redirect PHP

Any web server anywhere will do. You just need to place a very simple redirect PHP file on it. Name it “redirect.php and place it in the appropriate document folder of the web server. Make sure the file has the proper (read, execute) permissions.

The PHP file:

<?php

//gets the query string for the value of ‘project’
$project=$_GET[‘project’];
//concats url with ID from query string.
$url = “fmp://YOUR_FM_SERVER/Database.fmp12?script=SOME_SCRIPT&param=” . $project;
//redirects to new page.
header(“Location: ” . $url);
?>

The FileMaker Scripts

  1.  You need a simple script that the PHP file will call. It will need to define the received parameter and perhaps search for the aforementioned project by ID. Obviously the script can do more, depending on your business process.
  2. And the script that calls your redirect.php on the webserver. It should generate and copy your link to the clipboard:

    https://YOUR_WEB_SERVER/redirect.php?project=PROJECTID

Then that link can be pasted anywhere and will be clickable.

Getting Data From WordPress To FileMaker II

In my previous post, Getting Data from a WordPress to FileMaker I detailed how you can get mySQL data (that perhaps comes from a WordPress form submission) into FileMaker.


This time I’ll write about how you get that data into your own FileMaker table.


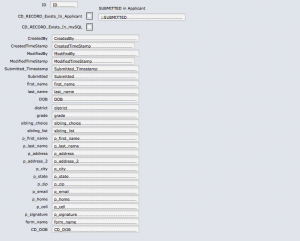
I recommend “importing” the data from the mySQL database into a temporary table. We called ours APPLICANTI_TEMP.  It contains the same exact fields as the mySQL database and it is there so you can identify records in between the two tables. So in my case the fields are text fields, just like in the mySQL DB (even the timestamp). But then we added a timestamp field that is a regular FileMaker TimeStamp and when we run the scripts we set this with the proper FM TimeStamp.


I added two calculations:

  1. One that checks whether the record we are viewing exists in the mySQL table and
  2. Another one that checks whether we have added the record to our APPLICANT table.


Screen Shot 2015-04-15 at 6.45.02 PM


These calculations are quite limited but in my case achieve the wanted result. I am not too worried about someone modifying the records in the mySQL table, because I’m the only one with access to it. But you’ll have to make decisions based on what’s best for you. I, however wanted to make sure I’m not creating the same record several times in the APPLICANT table. Well, we still are, because people apparently fill out and submit the form (sometimes with mismatched information?!?) several times. So at the end of the day you’ll still need a human to identify if a second record has a misspelled last name or it is, indeed a different applicant. But in case you have a scenario that disallows record deletion based on some criteria, you’ll need to develop a more refined logic.


I have already converted my SQL TimeStamp to a FileMaker readable timestamp, but if you don’t do that in your Query you’ll have to do that in FileMaker. Bring Dunning’s Custom Functions collections is always a good place to start looking for handy custom functions.


Screen Shot 2015-04-15 at 7.07.08 PM


We have a set of scripts that perform the data move (because it’s not really an import). They loop through a set of fields on a layout record by record and create the record in the TEMP table, then the APPLICANT table. These scripts are run from the server every 15 minutes. You set your time interval based on your own process.


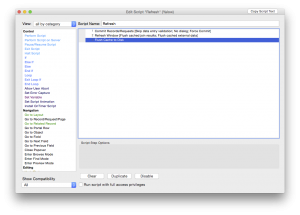
The first step is to refresh the data from the mySQL database, because unless you do that any new submissions from the web (in my case) will now show in FileMaker:


Screen Shot 2015-04-15 at 7.10.51 PM


Before running scripts from the server, always make sure you test the hell out of them locally first. Here’s an article on server-side scripts in general. I always recommend adding a LOG table, and put in error checking in your scripts, especially when you’re running them from the server. You DO NOT have a debugger on server. And who wants to code blindly?!


And if you’re lucky—like us—you’ll have to parse the data into different tables, because you’re dealing with parents, addresses and phone numbers. You’d obviously want to do that from the TEMP table record.

Hope this covers it all. Any questions, feel free to ask.

Coding Principles And How They Apply In FileMaker

Coding Principles in general

When I dabbled in development first time I had no idea I actually was developing. I was just adding a few fields here and there. Mostly I just wanted a way to record information on tracking film materials, dubbing, etc. And for the next decade I did the same: I hacked my way to getting things done for the boss. And while I tried to protest, the boss always won and said “but I need it now.” That leaves zero time for planning or building architecture. So I was more of a firefighter than developer. The next decade I spent learning development from scratch and I keep learning.

Simplicity is the most important consideration in a design

Whether you’re a hard core coder who eats, sleeps and breathes code or a school teacher turned FileMaker developer, you sure have some principles that you abide by (and if you don’t you should). We live by principles, so why shouldn’t we code by principles? And when you code, you often ask yourself “is this the best possible way to solve the problem?” In FileMaker there are at least three ways to do the same things. And there’s a different

Since this blog is mostly dedicated to FileMaker development (at this point), I’ll just take a stab at some coding principles and see how they apply to us, FileMaker developers.

YAGNI (You Ain’t Gonna Need It)

The idea is that you should code with the goal in mind to program for what you need not what you might need. XP co-founder Ron Jeffries has written:

“Always implement things when you actually need them, never when you just foresee that you need them.”

The temptation—to create something—is large for a developer. It is like putting a knife in a surgeon’s hand or giving a pencil to the architect; they will want to do what they do best. We want to add bells and whistles and we want to blow the client away. But just like furniture shopping at IKEA, we can end up with a lot more than we can take home. It’s better to code for what the client needs than what the client wants. Personally, I’m an advocate for this and I always tell my clients: “I will give you what you need but not what you want.”

Worse Is Better

Aptly, also called also called “New Jersey style”.  [And if anyone ever wants to mock Jersey, again, they will meet my fist.] The idea behind it is that “quality does not necessarily increase with functionality”.  So what this does is it uses a scale to measure which one is heavier and says simple is heavier than correct. So to me this boils down to getting a solution off the ground and into the users’s hand rather than making it perfect.  You need to cover as many aspects as you can to make it practical. Your design needs to be consistent but simple. So, buttons, element placement and font sizing should be consistent from layout to layout. Luckily we have FileMaker 13 now so if you use a built-in template (or build your own)it’s hard to go wrong.

KISS (Keep It Simple Stupid) principle

This acronym is a design principle noted by the U.S. Navy. Achieving simplicity should be the goal at all times, and avoid unnecessary complexity. Design your layouts with fewer buttons and make sure they do the most important functions. Then you can take the user to a different tab or layout to give them further info. Give them a drop-down menu with further options if you must.

Don’t repeat yourself (DRY)

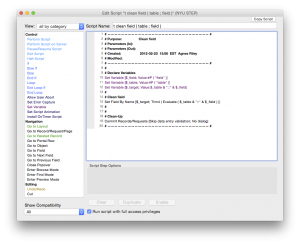
When FileMaker gave us variables, it became possible to start writing universal scripts. If you’re still not using variables you’re missing out on something great! They allow you to compact your code. You can write one script to create, delete, modify a record and give parameters to tell what layout you are coming from, what your table is, where you need to end up when you’re done. Of course, there will be variations which you can put in an if statement if you need it. But if you can create something once and reuse it, you’re golden. Below is a script we use to strip fields (after a user adds data that) from unnecessary garbage.


clean-field-script

Clean Field Universal Script


More useful coding principles: Wikipedia

Getting Data From WordPress To FileMaker

How many times we find ourselves presented with a new challenge when working in FileMaker? I will say this: more often than not. I like challenges. They make you learn and keep you on your toes.

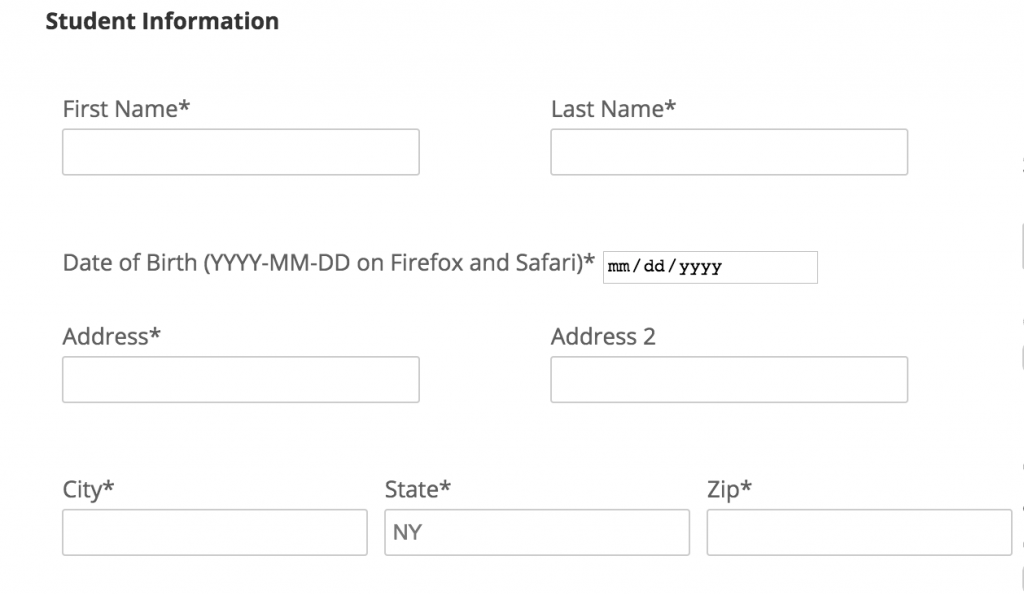
My client has a website for a new school which we built in WordPress: www.yalowcharter.org. He was interested in getting data from WordPress to FileMaker. The school is accepting applications for students. He needs the applications to be in a FileMaker database so we can keep their information (children names, parents, etc.)

Screen Shot 2015-02-26 at 11.18.51 AM

I’m using the ContactForm7 plug-in to collect the information. Visitors can fill out the form and submit the info. The great thing is the plug-in works well, it even has a CAPTCHA element (separate plug-in required) so you won’t get spammed by bots. It however can only email the data from the form collecting all the  data and dumping in the body of the email. That is as far from a relational database as it can be.

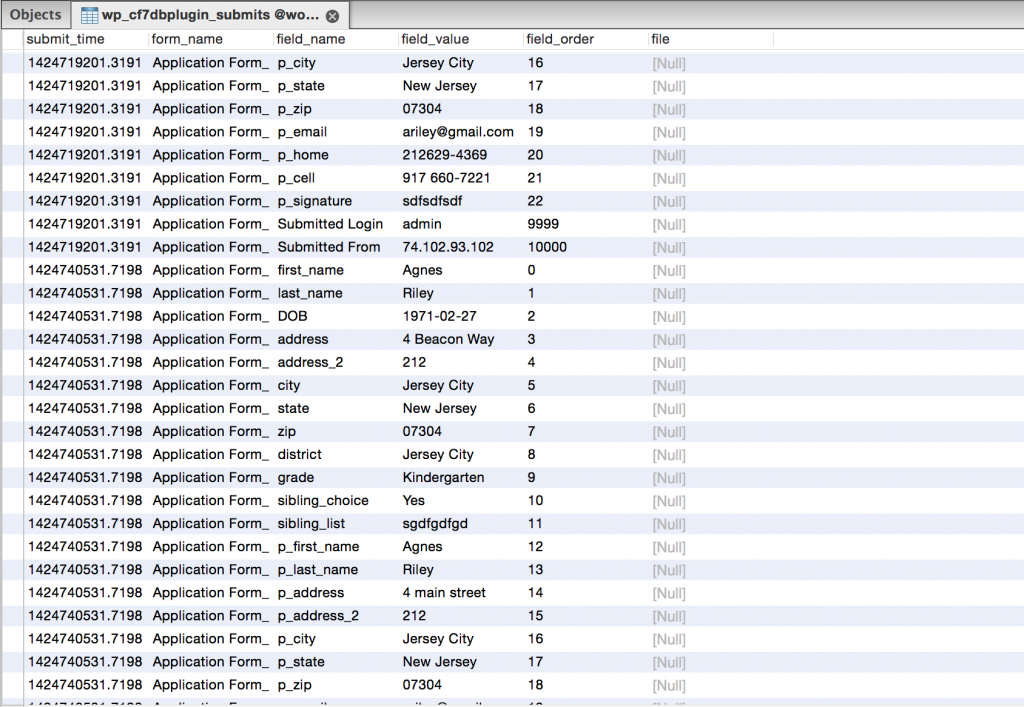
So after a little digging I found another plug-in (Contact Form DB) that can dump the collected data into a MySQL database. I was excited like a little kid. Then came the next hurdle: all the fields with their data created a new record. And the MySQL timestamp, of course is not oh so delightful. By the way, I use Navicat for working with SQL tables, but you can use PHPmySQL, and that will do the job, as well.

Screen Shot 2015-02-25 at 11.38.06 AM

Turns out all I had to do is write a SQL query to turn that into a nice VIEW and now I have columns and rows with a properly formatted timestamp. So here’s one query that can help you write one:

SELECT
DATE_FORMAT(FROM_UNIXTIME(submit_time), ‘%b %e, %Y %l:%i %p’) AS Submitted,
MAX(IF(field_name=’first_name’, field_value, NULL )) AS ‘first_name’,
MAX(IF(field_name=’last_name’, field_value, NULL )) AS ‘last_name’,
MAX(IF(field_name=’email’, field_value, NULL )) AS ’email’,
MAX(IF(field_name=’cell’, field_value, NULL )) AS ‘cell’,
MAX(IF(field_name=’website’, field_value, NULL )) AS ‘website’,
MAX(IF(field_name=’service_provided’, field_value, NULL )) AS ‘service_provided’,
MAX(IF(field_name=’address1′, field_value, NULL )) AS ‘address1’,
MAX(IF(field_name=’adress2’, field_value, NULL )) AS ‘address2′,
MAX(IF(field_name=’city’, field_value, NULL )) AS ‘city’,
MAX(IF(field_name=’state’, field_value, NULL )) AS ‘state’,
MAX(IF(field_name=’zip’, field_value, NULL )) AS ‘zip’
FROM wp_cf7dbplugin_submits
WHERE
form_name = ‘Individual Membership Form’
AND
form_name = ‘Student Membership Form’
GROUP BY submit_time
ORDER BY submit_time DESC

And that produces something like this. If you have errors Navicat will let you know.

Note: Make sure you use straight quotes, aka not curly (or smart) quotes such as the ones text editors use.

Screen Shot 2015-02-25 at 11.38.39 AM

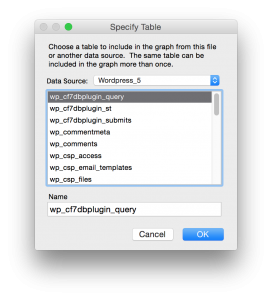
The next step is using the Actualtech plug-in (ODBC connector) on the FM server to set up a DSN so you can access this data. You’ll have to define your database (tables, view, username and password).

Note: Make sure you select “view”, as well because it is not an actual table you need but the view you created with the SQL query.

After that you create a new external data source in your FileMaker database and create your table occurrence from it.

Screen Shot 2015-03-03 at 4.33.45 PM

You can actually just display this data in your database but it’s much more sophisticated and safer to bring that data over to FileMaker. Of course you can do this in different ways. I have to parse the data into multiple tables because we are dealing with related data (kids to parents, phone numbers to parents). I will just run a server script that will check for new records and create them on the FileMaker side when new records show up.

One last important thing to pay attention to is that just because a form is submitted and a record is created in the MySQL database the record will not show up automatically in the FileMaker database. So you’ll have to refresh.

Now, of course when you’re dealing with data you’ll have to put in some checks and balances. Data can be submitted twice because of computer or human error into the MySQL database but we don’t need that twice in our FileMaker database.

I think this is a pretty simple and easy way to get data into FileMaker from a WordPress site.

Update: We’ve published a follow-up article, you can read here:

New Development vs. Phase II or Maintenance

New development

The majority of the client work we do is new development. New development is when a client does not have a FileMaker database (or has a very old database that does not fit their process) so we create them a solution from scratch. The process for that is outlined in this article, so I’m not going to detail that. The bottom line is that we start in a sandbox and we build them a castle of some sort. We start with discussing the possibilities,  we plan, we create mind maps, mockups, all good, creative stuff that has tangible results. The client is super-excited, they come up with a long laundry list of requests that we sift through and  narrow down until we establish what will be in Phase I. Everyone loves you, the boss, the secretary, even the boss’ wife. You get taken out for lunch, they talk to you often, with a lot of excitement in their voice. You are their hero. You are the person who will bring them to the 21st Century, you are Superman who can fly across the sky and can’t do wrong. And you can’t do wrong. You give them what they need, if you can guide them well, as opposed to what they might want. The only tiny thing that can cloud the whole process is that they actually will have to pay for the work, but since they have realistic expectations of what they are getting, that’s not really an issue. Very few clients actually bargain once they get a proposal, because by then they have an approximate idea of how much Phase I will cost and what they will be getting for that money. Now, all we have is the anticipation and the development work. Ad if we did our job well, the client is extremely happy with the result of our hard work (which they don’t see, of course, but everyone knows Rome wasn’t built in a day and you have to move a lot of bricks to get anything erect.)

The client starts using the database

At first there’s overwhelming happiness from half the employees, while the other half won’t even touch it cause the database must have the plague. Slowly but surely the head of the firm will get everyone using it. That’s when the chaos hits. Requests come in from left and right and of course, you still have some bugs to iron out. We generally do free bug fixes for 3 months after the release date. That is the industry standard. Of course, we tend to be more lenient than not, ssh…

Here come the modifications

We recommend putting those on a project named Phase II, so the client has a clear understanding that A) those are not bugs (something that was programmed faulty), B) what needs to get added to the database. Since we charge for estimating (because it is a lot of man hours to provide with a somewhat accurate account of how long the work will take, therefore how much it will cost), people elect to just pay up front, get a discount and have us work the time off. This seems to only work for awhile. At some point or another every clients starts questioning the funds put towards continuous development. I have a client whose database was developed by them and we just came in to make modifications, to make the database more modern, better-functioning, convert it to FM12 and add bells and whistles. After working together for about a year I get the question: we’ve spent over x amount of dollars and we still don’t have a working database. The client is regularly unhappy and not the kind of client I was talking about in the beginning of the article. Why is that? Let’s see. From the client’s standpoint, the requests are simple, I just want a new shipment section added to my database. Sounds simple, right? Yeah, it’s as simple for the trained developer who receives clear instruction as it is for the NASA to launch another rocket. Every adult brushes their teeth every morning (one would hope) and none of us think about whether we pick up the toothbrush with our left hand or right, how much toothpaste to squeeze out and how long and with what motion we’re supposed to brush. Now, try to have someone stand next to you, who says, wait, you left out top-left-3, and you have a speck in between 4 and 5. Oh, and you need to massage your gums, too. And what about flossing? Look what you’re doing, you ran out of toothpaste, and you’re dripping on the floor, go get the mop! At some point you’d put the brush down and walk out of the room. And the 3-minute task certainly ended up being half an hour. Hope my example illustrates my point: without clear direction it’s impossible to perform any task. Now, let’s add to the mix that people actually pay for your time, therefore you are bound to them.

When you perform modifications on a database—whether you built it or anyone else—any little change you make affects previous development, can cause bugs that you’ll need to fix that can cause other bugs, etc. It can get really hairy, even if the client has a clear vision and realistic expectations.

Here are the caveats to implementing changes:

  • Changes take a lot longer to implement than original, similar features;
  • Often there is no visual gratification;
  • Bugs keep popping up that further delay the work;
  • Client is thoroughly unhappy waiting for the change;
  • You end up billing 20 hours, even though you worked 30, because the client thinks it was a quick change that should’ve taken 5.

The bottom line is: nobody’s happy throughout the process even though the end result gets to be what the client wants.

The solution?

I think my solution will be to treat every modification/change as new development. We will create a mockup, estimate the work and charge accordingly. Then we’ll handle the next batch of changes. It takes finesse to build a database on a solid foundation so you can add features easily later. We aim to do just that, so we’ll have the best chance to keep our clients satisfied. Another thing to pay attention to is mapping out phase II while working on phase I, so we can accommodate those changes  much easier when it is time to do so. You know, a stitch in time saves nine. Still you can have misunderstandings, but at the end of the day you’re still better off because both parties agree to what’s going to be done.

Comments are welcome both from developers or clients.


FileMaker Go and Barcode Scanning – A Workaround

We all know that there are differences when dealing with FileMaker Go vs. FileMaker on a desktop. I think I can speak for all of us when I say we’re grateful that FileMaker Go exists, but we have to admit it has caveats. But we’re resourceful developers, right? We will sit and try ti tackle any given problem, because that’s what out clients/bosses pay us for. Most importantly, we cannot sleep until we figure the issues out because it just bothers us when we’re presented with a problem that we cannot find a solution for.

We sell barcode scanners. We make sure all of our scanners work with FileMaker, and all of our Bluetooth scanners work with FileMaker Go (and, of course, Android and other devices that sport Bluetooth connectivity). So far so good, right?

I’ve been getting complains that it’s impossible to scan into FileMaker Go. When things dont work like they’re supposed to out of the box.

The Problem

In FileMaker Pro you can script the scanning process to show a dialog that you scan into. This is great, because all the scanners you can program (which is usually the default anyway) to send a carriage return (enter) at the end of scanning. Which means that when the scanner is done scanning your code, the “Ok” button will be pressed automatically and your script can continue what it’s supposed to do, whether that is the bring up the dialog to scan another code or do some crazy magic and analyze data. You, however cannot achieve the same result in FileMaker Go, because you cannot get the cursor into the dialog. Now, we can ask questions like ‘why’ and spend hours and days cracking our heads open and even email FileMaker Inc. to see why this is not working. Or we can simply create a workaround.

The Solution

You can download a simple file that demonstrates how you can get around the problem with barcode scanning in FileMaker Go. I used a field to scan into instead of the dialogue and two triggers so you can create records and keep on scanning. There’s one field and one button on this layout. Obviously, you will have to scrip the rest of your process.

We can take the load off of you by doing the heavy lifting. Scripting can be cumbersome, when all you want to do is just scan an item and manage your inventory. Let us help.

We sell a wide selection of Bluetooth Laser Barcode Scanners that work with FileMaker Go out of the box . Pair, connect and scan right into a field. Want to use the iOS keyboard? No problem, push the small button and the keyboard will pop up.

Converting Files to FileMaker Pro 12

As you may know by now FileMaker 12 is out. A lot of articles have been written about the various features, so I’m not going to bore you with that. FileMaker 12 for iOS is free, so if you haven’t grabbed a copy, go get it. It comes with some demo files to play with to learn about the new features.

With every new release the question comes up: should I wait or should I convert? I think this question should be answered separately whether you’re a developer or a user. Users tend to jump in a lot faster. I have users who just announced they converted their database. Once it’s done—and you start using the database— it’s hard to go back. Developers I talked to are wary about converting, so we have two different groups with one goal: data integrity, however, their patience levels are different.

FileMaker Pro 12 can directly convert your existing FileMaker Pro 11, 10, 9, 8 and 7 databases.  All other versions of FileMaker Pro will require a multiple product conversion.  Review the information below to determine whether your files will directly convert to FileMaker Pro 12, or if they will need to be converted multiple times.

More info can be found in the FileMaker KnowledgeBase.

So, before jumping in, let’s look at a couple of things.

If You Are A User

First and foremost discuss the conversion process with your developer, if you have one. It’s a new file format, you’ll need to upgrade the server, as well as the file(s). If you don’t have a developer, take a look at your dataset. I heard complaints about issues with scrolling in list view. This may not affect you if you don’t use list view, but it’s worth knowing. I, for one, never use list view in the solutions I develop. I use portals that can be filtered in many ways instead, so you don’t have to work with large sets of data at any given time.

Take a moment to consider how mission-critical your solution is. If you’re a small shop (couple of people) with a one-file solution you may be able to just jump in and bite the bullet. You may never have any issues. And you may love a lot of the new features FileMaker 12 offers including the new layout themes. I’d still make a copy of the new database and run FileMaker 12 parallel to your FileMaker 11 (yes you can) and test the new database for a good couple of days. Run scripts, create records, check the mission-critical processes.

If you’re a larger shop or your database is mission critical, I’d take a copy of the file, convert it, put it in a test environment. Put in on a new server (different machine than your FileMaker 11 server). Test your new database thoroughly for about a week. Test systematically. Test for as many processes you can.

If You Are A Developer

Then it is your duty and responsibility to manage client expectations and not let them commit suicide. The same applies to you as the large shops who have a test environment and can perform lots of tests. But you also need to consider that FieMaker 12 has changes that affect the developer, as well. One example the new layout tools. Test the development features, as well, to make sure you will be comfortable developing on the new version.

We’ve been waiting awhile for FileMaker 12 and we are all excited. I love the new Insert from URL function, for example, but  when I developed a database for the iPad for a client, I noticed that getting XML takes 5 minutes on an iPad2 in FileMaker 12. This is not a concern for my client, I believe, but it can be a concern for more mission-critical environments.

It’s possibly best to convert, while your users are not using the database. A weekend might be a good time if you can’t set up a test environment. But as you know, we have 4 weekends in a month, so don’t schedule more conversions than you can handle.

Talk to us, if you need help converting your FileMaker files or have questions about development.

Importing Email Into A FileMaker Database

Email is a hairy subject. Not just because we have POP, IMAP and SMTP servers to deal with, but also ports, authentication, port restrictions by ISPs, syncing problems, etc.

I generally tell users to sick to their email programs, if that’s an option.

There are certainly some times when it’s worth dealing with it and that call, my friend, you will have to make. I can tell you I once implemented HTML sending for mass-mailing purposes, and it worked really well, we even tagged the client we sent the email for and kept the campaigns, as well as created join records for the email recipients so we could track history. Of course, this was before the day of MailChimp (which we are using). I love MailChimp and there’s no need to reinvent the wheel so I can reproduce something in FileMaker.

I however, have a client who wanted to see emails sent to and received from clients’ contacts for all employees of the firm, also see them from the job’s perspective: because the previous software (DayLite) he was using did integrate email with his project management. So, I looked at different options and decided to use mail.it.

There are other options out there, but I used mail.it before so I stuck with it and I do not regret it. I had a couple of gotchas along the way (e.g. deleting emails from the server for multiple servers), but all’s well that ends well. Customer support at dacons.net is also excellent with a support forum. Their turn-around was not the quickest, but that’s not really their fault, because we have a 6 hour time-difference.

I think, at the end I accomplished creating an interface that acts and looks like an email client. I am using the webviewer to show the message as HTML. Attachments show up, and you have two options: 1. you can hold down the option key to view them in a new window or you can download them. Attachments are NOT stored in the database. Attachment handling is accomplished with SuperContainer by 360 Works.

Of course, email receiving will be accomplished from the server side. It will run at a 5-minutes interval, just as if you had it in an email client.

Good-Looking Progress Bars In Portals

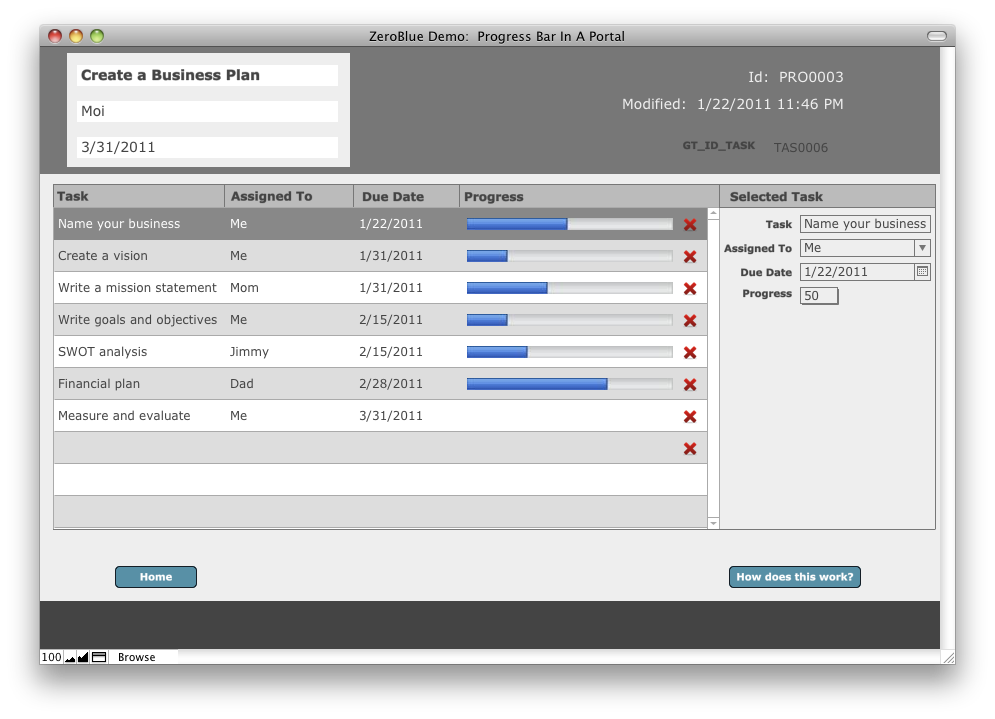
Now the demo file is multi-platform.

Hopefully, I am not the only FileMaker developer who would like to see good-looking progress bars in portal rows. It is not the easiest task to achieve this, however. Most web developer friends wold say, they don’t understand the problem. They would even offer to make some javascript code to get the ball rolling. What they don’t know is that web viewers won’t display from a portal row, therefore you cannot display a web page in a portal. Some people make progress bars by using repetitions of the same field with conditional formatting. I don’t find those aesthetically pleasing. More often than not, when I need a trick, someone has already come up with it, however, this I couldn’t find anywhere. (If I missed something cool, let me know.)

So, one night I was thinking about how to make a good-looking progress bar in a portal. Since lately I’ve been poking around in the solution file for the 360 Works ScriptMaster plug-in, I turned it to see if anything pops out that can help me. Then I thought to myself, what if I had a nice progress bar generated by HTML code and I’d take a screenshot and dumped it into a container field.

This is not a perfect solution to the problem and some of you might say it’s not elegant. I think it does the job and the result is a good-looking progress bar that you can change with a drop-down menu. It requires the free ScriptMaster plug-in, which will be installed upon opening the file.

I’d like to thank Tim Cimbura for his “Awesome Progress Bar” example. Google it for more info. If you’d like to take this a step further, create your progress bar in Photoshop to match your DB style (or different colors for different percentages), export them as PNG24 then encode those as Base64 individually. Then replace the code in the web viewer.

If I have time, I’ll update the file.
Download the updated demo file

Instructions

The example file contains a “Projects” layout that has some related tasks. The layout also tab contains a tab control that’s hidden from the untrained eye. Don’t be afraid to play with the file, you can always download another copy.

One of the invisible tabs contains a web viewer that has HTML code in it that generates the progress bar. This part I borrowed from Tim Zimbura.

Follow the steps below to implement this in your own solution:

  1. Add two fields to the table you show the records from in your portal: a container field called “container” and a “percent” number field.
  2. Copy and paste the whole folder of scripts called “Copy This Folder To Your Solution” into your solution. Place a line in your open script to run the “. register functions” script.
  3. Place the container field in your portal. place the percent field in your area where you modify your selected records.
  4. Copy the HTML code from the Web Viewer in my solution and paste it into a text editor.
  5. Copy the tab control from the “Projects” layout and paste it onto your parent layout showing the portal.
  6. In the text editor replace the field in the HTML with your container field, then copy and paste the code into the web viewer you just placed on your layout.
  7. In the script called “. generate progress bar”, point the missing field to your container.
  8. Make the percent field trigger the “. generate progress bar” script OnModfy.
  9. Go back to browse mode and check it out.

Enjoy!


FileMaker Server-side Scripting

Running scripts from FileMaker Server can dramatically reduce execution time. I have been an avid fan of server-side scripting since it was introduced in FileMaker 9. Now, with the introduction of FileMaker Go it is more important to take the burden away from the client and do as much processing on the server as possible. There’s no need to bog down a client when the server can take care of the task in the fraction of the time it takes to run from client. You can use server side scripting to automate record updates from external sources, prepare those pesky Monday morning reports so they are printed by the time everyone comes in or simply use it to update stored data instead of using calculations.

You can run FileMaker scripts or System Level Scripts or even combine them to run a script sequence now! This article deals with FileMaker scripting.

We tend to think, now that we have this feature, we can just build our scripts, run them from server and be done. This isn’t quite true…we have to follow up with the all-important troubleshooting period. At least in my experience, there is no server-proof script that can be installed on a server without further testing and digging and modifications.

So, I collected some pointers from my–and fellow FileMaker developers’–experience that might help you speed up your development when running scripts from server. Don’t be discouraged. You will be happy with the results. Jump in and put some of those tedious scripts on the server, so you and your users can forget about them.

Things to know:

  • Make sure all your script steps are server compatible (choose “Server” under “Show Compatibility”–bottom left corner of “Manage Scripts”).
  • The server runs the opening and closing routines, so you might want to revise your “onOpen” and “onClose” script to bypass some steps that are not relevant to the server.*
  • Globals are set. This may not be an issue, but might be worth paying attention to.
  • No need to script opening a new window, because the server does not execute the scripts from physical windows, but rather a virtual space.
  • If you are referring to an external file in Manage/External Data Sources, folder names have to be hard-coded in the string (such as file:/folder name/folder name/file name.fp7 or filewin:/ if you are on Windows Server).
  • Import locations can only be either:
    • the Documents folder within the Data folder under the FileMaker Server root on your server machine (you can use Get ( DocumentsPath) to get you the right path; Windows users, don’t forget to use the “filewin” prefix);
    • the Temp folder (you can use Get ( TemporaryPath) and see the notes above).
  • Watch the log after you set your script to run, it can only help you!
  • Set up notification emails so you can be aware if something went wrong (you can turn these off after awhile).
  • Errors reported are FileMaker errors, not server errors.

Some caveats:

  • Lack of instant feedback. Even though you test until death locally, new problems can arise when running from server. Put in error checking after every step. I would also highly recommend logging script times.
  • You have to disconnect the client that runs the server script if a script hangs.
  • The script will hang if you forget to put in the “Perform Find” script step (possibly other actions or lack of them can hang the script, as well).

That’s it for now, but I will be adding to this article, so feel free to check back on occasion.

* I usually set up an account called “fmserver” to run the scheduled scripts with. Then I edit my onOpen script to bypass the opening routine if the account is fmserver. That can cut down on time and avoid unnecessary script steps.

Credit: Steven Blackwell, Todd Geist